#Cookiecares Project

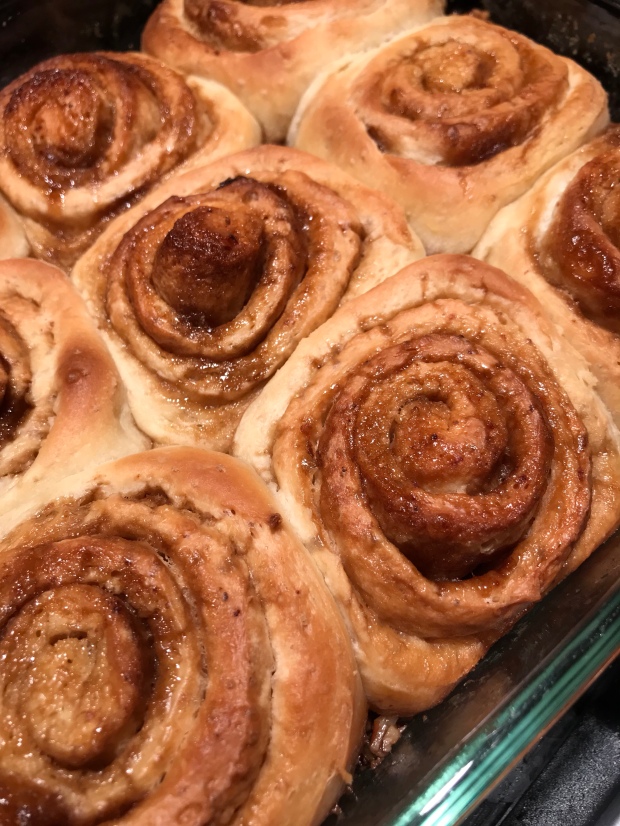
A big part of why I enjoy baking is knowing the smiles it brings someone else. Whether it’s a birthday, a shower or just a surprise batch I’ll never miss the opportunity to see my treats help improve someone’s day.

As COVID-19 essentially shuts down many people’s businesses and we all social distance to cut down on spread, I’m reminded of those who can’t stay home. There are so many essential workers who don’t have the option to stay home. The simple act of staying home seems so easy when you think about those who don’t have that option! I can’t imagine the stress this puts on these heroes and their families, but to anyone who doesn’t have a choice to stay home thank you for your service!

Social distancing has been a difficult thing to explain to my four year old son, Charlie. He misses his friends, school and even just trips out to a library or museum. We try to keep it simple and talk about it as a cold, something he understands. As I try to explain to him over a pancake breakfast that the “cold” hasn’t passed so no play dates, I remind him that there are some parents that still have to go to work. He immediately runs and grabs his elderberry gummy and suggests we need to give them to more people to stop this cold. While the sentiment was there, I told him gummies were a hard thing to share but he liked the alternative suggestion which was cookies. After he ran to grab his “If You Give a Mouse a Cookie” recipe book, he walked me through all the cookies we could make.

While we didn’t make those featured in his book, we decided to do a mix of some of our favorite chefs with some of our favorite cookies for this #cookiecares project (you’ll find links below). A local nurse agreed to take the cookies to work to share with her coworkers and we hope that these cookies will help to bring a smile to a hero working hard during these difficult times! These are stressful times for ALL and I’m sure one of the below cookies will help bring a smile.

Ina Garten’s Outrageous Brownies are just that, truly outrageous and amazing! I dare you to eat just one.

Abby Dodge’s Lemon Melt-aways are made with only 4 ingredients and remind me of warmer days to come (also features great flavor twists in her cookbook if you aren’t a lemon fan).

I’ve never met a baked item from Sarah Kieffer I don’t like. Her Chocolate Sugar Cookies don’t disappoint!

Michele Rosen, although better known as Paleo Running Momma, has creatively found healthier ways of baking. Her Chunky Monkey Cookies are some of the thickest cookies I’ve seen without any refined flour or sugar.

Lastly, I made my Oatmeal Scotchies for delivery. They are a favorite of mine and bite size to easily be eaten on the run. It contains brewers yeast and flaxseed for added B-vitamins and protein. I dare you to eat just one.

I’d be remiss not to mention the gummies that Charlie wanted me to make for the workers. Danielle Walker, another paleo chef I highly recommend, has a great “cold buster” gummies.

S’mores Blondies

Summer and s’mores go hand in hand for me. This past year we let my 3 year old have his first s’more. He had only known marshmallows to be an after sledding treat in his hot cocoa. After he got over the initial shock of us “burning” the marshmallow, his face lit up after one bite. Despite his new love of s’mores, his memories with marshmallows seem deeply rooted with winter memories; he’s been asking for the “jingle bells” song now! With these bars, s’mores can be enjoyed all year long and here’s to hoping my sons memories of marshmallows will extend past winter.

1 cup + 1 tablespoon graham crackers, divided
1 ¼ cups all-purpose flour
1 teaspoons baking soda
1 teaspoon salt
1 cup [2 sticks] unsalted butter, room temperature
1 packed cup light brown sugar
½ cup granulated sugar
2 large eggs
2 teaspoon vanilla extract
10 ounces bittersweet chocolate*, coarsely chopped into chunks, divided
3 cups mini marshmallows

*Tip – Chocolate chips contain stabalizers so won’t melt as well for topping. Consider using chocolate bar for topping if using chips for bars.

Preheat the oven to 350 degrees and arrange oven racks in the upper and lower thirds of the oven. Coat the inside of a 9×13-inch pan with nonstick spray.

In a medium bowl, mix the 1 cup graham cracker crumbs, flour, baking powder and salt until combined. Set aside.

In the bowl of an electric mixer fitted with the paddle attachment, cream the butter, brown sugar and granulated sugar on medium speed until light and fluffy, 4 to 5 minutes. Turn the speed down to low and add the eggs one at a time, mixing until well incorporated. Add the vanilla and mix to combine, stopping to scrape down the bowl if necessary. Slowly add the graham crumb mixture and mix until just combined. Mix in 8 ounces of the chocolate with a spatula. Scrape the dough into the prepared pan and use your hand to press the dough into a even later.

Bake on the lower rack of the oven until the bars are golden at the edges, 25-30 minutes. Remove the pan from the oven and sprinkle the marshmallows evenly over the surface. Return the pan to the top rack of the oven and bake for 6-8 minutes until the marshmallows are golden. Remove the pan from the oven and sprinkle 2 ounces of chocolate crumble over the top. Return the pan to the top rack of the oven and bake for 2-5 minutes until the chocolate has melted and marshmallows are roasted. Sprinkle 1 tablespoon graham cracker crumbs over the bars and allow to cool for 45 minutes before cutting.

Blueberry Cornflake Muffins

Blueberries are by far my favorite berry! I think my mom engraved her love of blueberries in me since my some of favorite books growing up was Jamberry and Blueberries for Sal. Blueberries never lasted long in my household. They became muffins, sprinkled over yogurt or cereal, or were used in pancakes to make faces. That’s the one berry we could never spare a single one to make jam or any kind! Thanks to my moms blueberry bushes we always seem to have blueberries in our fridge at all times!

After watching the Netflix Chef’s Table feature on Milkbar, I was inspired by Christina Rossi taking her love of cereal and combining it in with a classic baked good. These blueberry muffins do just that, take my love of blueberry muffins and combine that with the crunchy goodness of cornflakes.

Hope you love this twist on a classic!

Muffins (yields 12 muffins)
½ cup [1 stick] unsalted butter
½ cup sugar
2 cups all-purpose flour
2 teaspoons baking powder
½ teaspoon salt
¾ cup cereal milk (recipe below)
½ teaspoon vanilla extract
2 large eggs
2 cups blueberries

Topping
1/4 cup [1 stick] unsalted butter, softened
1 cup cornflakes, preferably organic or without high fructose corn syrup
1/4 cup turbinado sugar

Cereal Milk (yields ¾ cup)
1 cup milk
¾ cup cornflakes

Instructions
To make the cereal milk – Preheat oven to 300 degrees. Once preheated, toast ¾ cups cornflakes for 15 minutes, until golden. Add the toasted cornflakes to the milk and allow to seep for 20 minutes. Strain mixture through a fine strainer, collecting the milk in a measuring cup. Squeeze the cornflakes to make sure all the milk comes out of the cornflakes. Set aside until needed for muffins. (Make ahead tip – make the night before and store in the fridge until needed for muffin batter)

To make the topping – Cut the butter into cubes. Combine the 1 cup cornflakes, cubed butter and turbinado sugar in a small bowl. Mix with your hands, slightly crushing the cornflakes, until all are combined and there are no more chunks of butter visible. Set aside.

To make the muffins – Preheat the oven to 350 degrees. Grease a 12 cup muffins tin with butter or nonstick cooking stray, or use baking cups. In a medium bowl, whisk the flour, baking powder and salt, set aside. In a large bowl, cream the butter and sugar with a electric mixer until smooth. Add the cereal milk and vanilla, mixing until smooth on low speed. One at a time add the eggs and stop to scrape down the bowls with a rubber spatula if necessary. Add the flour mixture and beat on low speed until just combined. With a spatula, gently fold the blueberries into the batter. Fill the greased muffins tin 2/3 full of the batter. Top with 2 tablespoons of the prepared topping. Bake until a toothpick inserted into the center comes out clean, about 25-28 minutes. Remove the muffins from the oven to cool and enjoy!

Ramekin Strawberry Rhubarb Crisp

Strawberries are always the start of the picking season here in Connecticut! Growing up, we would always go and help my mom pick berries, a tradition that I have continued with my own family. After picking what felt like a million berries, the kitchen would smell like sweet berries for days as favorites like strawberry jam, strawberry shortcake and strawberry crisp would be made to take advantage of our fresh picks.

Strawberry rhubarb crisp has always been a favorite of mine, the perfect mixture of soft baked fruit with a crunchy top. One taste and I’m reminded summer is finally here (the dollop of ice cream on top helps too!).

This year’s strawberry picking was even more special since my son could actually pick the berries, instead of just eat them, like he did our first year picking. After steering him to only pick the red ones, he was happy to attempt to fill his basket, taste-testing every so often to make sure they were still good! A week later, and he is still talking about the berries (and the tractor ride) we had at Jones Farm. As we made the strawberry rhubarb crisp, he couldn’t help coming back into the kitchen for some strawberry bites.

I’ve made this recipe in ramekins so it can be enjoyed with a smaller group (makes 4 servings) or can easily be doubled for a larger gathering. Happy picking and baking!

Filling – Makes 4 Ramekins
1 ½ cups fresh rhubarb, 1-inch diced (3-4 stalks)
2 cups [1 pint] fresh strawberries, hulled and halved, if large
¼ cup sugar
1 teaspoons grated orange zest
1 tablespoon cornstarch
3 tablespoons freshly squeezed orange juice

Topping
⅓ cup all-purpose flour
⅓ cup light brown sugar, lightly packed
¼ teaspoon salt
⅓ cup old-fashion rolled oats
4 tablespoons [½ stick] cold unsalted butter, diced
Vanilla ice cream, for serving

Directions

Preheat the oven to 350 degrees.

For the filling – toss the rhubarb, strawberries, granulated sugar and the orange zest together in a large bowl. In a small bowl, dissolve the cornstarch in the orange juice and then mix it into the fruit. Pour the mixture into the ramekins on a baking sheet.

For the topping – in the bowl of an electric mixer fitted with the paddle attachment, combine the flour, the brown sugar, salt and oatmeal. With the mixer on low speed, add the butter and mix until the dry ingredients are moist and the mixture is in crumbles. Sprinkle the topping over the fruit, covering it completely, and bake for 30-35 minutes, until the fruit is bubbling and the topping is golden brown. Allow to cool for 5 minutes before service. Serve warm with ice cream.

Lemon Coconut Pound Cake

My family welcomed our second child Hannah, who was born last February. It feels like yesterday, but as I remember with my son, the time goes by so quickly! As I feared, in the blink of an eye, my maternity leave was over, and I headed back to work this past week. 

While I was on my maternity leave, I had the pleasure of dropping my son off at his preschool, a seemingly boring task for most, but as a mom who always missed drop-off, I loved! After drop-off, Hannah and I would go for a walk through Southport, Connecticut, enjoying all the beautiful houses and boats in the harbor. I would frequently stop at SONO bakery and pickup a chai latte and, if I was lucky, a slice of their coconut buttermilk pound cake that they occasionally have. The recipe below is my attempt to recreate it, with lemon added for some freshness. As I eat it back in the office in NYC, I’m reminded of those past few weeks with my kids and those pretty walks in Southport.  

Cake
¾ lb [1 ½ sticks] unsalted butter, softened
1 cup sugar
2 cups all-purpose flour
1 ½ teaspoons baking powder
½ teaspoon salt
¾ cup buttermilk
1/4 cup lemon juice
1 teaspoon vanilla extract
3 large eggs, room temperature
1/4 cup lemon zest (3-4 large)
1 1/4 cups sweetened shredded coconut

Frosting
4 tablespoon unsalted butter, softened
2 oz cream cheese, softened
1 ½ cups powdered sugar
1/4 teaspoon vanilla extract
1 ½ teaspoons lemon zest
1-2 tablespoons milk
½ cup sweetened shredded coconut

Instructions

Preheat oven to 350 degrees. Grease and lightly flour a 8×4 inch loaf pan. 

Once oven is preheated toast the shredded coconut for the cake and frosting (1 ¾ cups) for 8-10 until golden brown, set aside.

To make the cake – In a medium bowl, whisk the flour, baking powder and salt, set aside. In a large bowl, cream the butter with a electric mixer until smooth. Add the sugar in gradually and beat until fluffy, about 2 minutes. Add the flour mixture in three parts, alternating with the buttermilk, lemon juice and vanilla extract, beat well after each addition. Add the eggs one at a time, beating well after each addition, scraping the bowl down when necessary. Fold in the lemon zest and 1 1/4 cups toasted coconut into the batter.  Pour the batter into your prepared loaf pan. Bake until a toothpick inserted into the center comes out clean, about 60-70 minutes. Remove the pound cake from the oven to a wire rack to cool completely.

To make the frosting – In a medium bowl, beat the cream cheese and butter with an electric mixer until creamy. Gradually add the powdered sugar and beat on low speed until smooth. Add 1 tablespoon milk, vanilla extract and lemon zest and beat until combined. If the frosting is to thick add additional tablespoon of milk to thin it out. Spread the frosting on the cooled cake and top with 1/2 cup of the toasted shredded coconut.

Apple Oat Pancakes

Growing up on the weekends my mom would always make breakfast where we would all sit down at the table and eat together as a family. It was quite the contrast from the weekdays where we were either running to school or my parents to work. There was no sleeping in on the weekends since breakfast was typically served by 9am. Every weekend it was something different – scones, muffins, pancakes, french toast you name it my mom could make it!

Pancakes were my first love affair with baking and honestly my first baked item I ever made. Since it needs so few ingredients and could be cooked and ready to enjoy in 15 minutes, it became a favorite to make for breakfast or even dinner on a occasional night! Even my son asks for pancakes every weekend and it’s one of the few things he’ll stop whatever he’s doing to run and help cook.

Fall is in full force in Connecticut and apple picking is a favorite activity for my family. I typically always come home with WAY too many apples and even after I’ve made applesauce, we are eating apples for weeks. This pancakes recipe is loaded with roasted apples both in and on top and I’ve used whole wheat flour which compliments the apples nicely! If apples aren’t your favorite feel free to swap with 1 cup of your favorite topping; other combos we love are bananas, blueberries or even chocolate chips for a true treat.

3 tablespoons unsalted butter, divided
1 ¼ cup milk
1 cup whole wheat flour
1/3 cup old fashion rolled oats
1 ½ teaspoon ground cinnamon, divided
1 ½ teaspoon baking powder
½ teaspoon baking soda
¼ teaspoon sea salt
1 egg
3 tablespoons maple syrup, divided
1 teaspoon vanilla extract
1 apple, peeled & diced into small bites

In a medium bowl, whisk together the flour, oats, 1 teaspoon cinnamon, baking soda and salt.

In small bowl, whisk the milk, egg, 2 tablespoons melted butter, 2 tablespoons maple syrup and vanilla. Whisk until thoroughly blended.

Pour the liquid mixture into the flour mixture and until just combined, set aside.

In a skillet, melt 1 tablespoon butter and sauté the apples over medium heat with ½ teaspoon cinnamon and 1 tablespoon maple syrup for 7-10 minutes, depending on how soft you want the apples. Mix the sautéed apples into the batter until just combined.

Heat a nonstick griddle or heavy cast iron skillet over medium low heat. To check if warm enough, drop water onto the pan and if sizzles on contact you’re ready to start cooking. In necessary, lightly oil the pan with butter or oil if you are not using a non-stick pan.

Using 1/3 cup measuring cup scoop the batter and pour onto the warm skillet leaving a couple of inches on all sides for expansion. Cook until small bubbles form on the surface of the pancakes, 2-3 minutes. Flip the pancakes and cook until lightly golden on both sides, 1-2 minutes more.

Repeat with the remaining batter an serve the pancakes immediately with toppings of your choice or put in 200-degree oven until ready to serve.

NOTE – if you want sautéed apples as a topping, sauté 2 apples with 2 tablespoons butter over medium heat with 1 teaspoon cinnamon and 2 tablespoons maple syrup. Only add ½ the sautéed apples to the batter and save the rest as toppings when ready to serve.

Raspberry Crumb Bars

After what feels like a impossibly long winter, we are finally catching glimpses of Spring here in Connecticut! As soon as the weather turns, I’m quickly hoping and wishing for fresh produce, but the reality is we still have a while until it’s growing locally.

This Raspberry Crumb Bar recipe gives me that taste of what’s to come in Summer, but since it’s made with jelly, you can enjoy them anytime you need a reminder of warmer days to come!

As Mother’s Day is just around the corner, I’m reminded, now that I am a mother myself, just how much work it is to be one! While it’s great to celebrate our moms, it’s also important to celebrate ourselves as mothers.

Near Mother’s Day weekend, I always try to plan a celebration for all the moms from my moms’ group to “celebrate us.” Usually, we begin with brunch,  then  head to a spa for some much-needed, oft-neglected pampering. It’s a special time where we take a moment to think of how far we’ve come over the past year. The time with our little ones goes so fast, but I love taking that time with my village of moms to celebrate all of our accomplishments. And of course, I bring treats!

For the last two celebrations, I have made this Raspberry Crumb Bar. While I made this most recent version with whole wheat flour to make it more nutritious, you can substitute for all-purpose flour.

Celebrate YOU and make a batch tonight, you deserve it! =)

1 cup [2 sticks] butter, softened
½ cup sugar
1 cup all-purpose flour
1 cup white whole-wheat flour
½ teaspoon salt
1 ½ teaspoon vanilla extract
10-12 oz raspberry jam (recommend Bonne Maman Raspberry Preserves)
2/3 cup granola (recommend Back to Nature Vanilla Almond Granola)
¼ cup sliced almonds (optional)

Preheat the oven to 350 degrees.

In a stand mixer/medium bowl, cream together butter and sugar until combined. Lower the speed and add vanilla.

 In a small bowl, mix together flours and salt; slowly add to the butter mixture, mixing until it forms a ball. Gather 2/3 of the dough, and press into the bottom of a 9 inch square pan, leaving ¼” border along the edges. Spread the raspberry jam in top of the dough, leaving the ¼” border uncovered. With your hands mix the last of the dough with the granola and crumble over the top of the jam, covering most of the surface. If using additional sliced almonds, sprinkle on top of the crumble.

Bake in the preheated oven for 45 minutes until lightly brown. Allow to cool completely before cutting into squares and serving.  

Note – if you prefer to use all all-purpose flour, use 2 cups all-purpose and omit the whole wheat flour.

Oatmeal Scotchies

While in college, we all would love opening our mailbox to find the package slip. No, it didn’t mean my Amazon order arrived (that wasn’t really a thing back then); it was a care package. I remember getting my first package within a few weeks of my arrival at Hobart & William Smith from my Grandma Bunny. Knowing my Grandma, I was sure it was some baked goods of some kind, and I ran back to my dorm to see what it was.

Even before opening, you couldn’t miss the smell of popcorn. I opened the box to find my grandma used actual popcorn as packing peanuts, and hidden within the popcorn was a bundt cake, cookies and even a sheet set (all thankfully in plastic). My grandma would repeatedly send me these popcorn boxes while I was in school, and the smell of popcorn would always draw my friends over for a visit and a treat. All, including the popcorn, was always devoured by me and my friends.

One of my favorites cookies of hers were her Oatmeal Scotchies (aka oatmeal butterscotch cookies).  And don’t worry –  if you’re not a fan of butterscotch, you  can easily substitute with chocolate. Unlike my Chocolate Chip Cookie recipe, I make these bite-sized, so they’re much more manageable for a snack. I used to always make a batch of these after my son’s birth since they were a quick, easily accessible snack. Unlike my grandma’s recipe, I added in flaxseeds and brewers yeast to help with self care in those early days, but both are totally optional when making!

1 cup [2 sticks] butter
3 cups old-fashion rolled oats
1 ½ cup packed brown sugar
1 ½ cup all-purpose flour
¼ teaspoon salt
½ teaspoon baking powder
½ teaspoon baking soda
5 tablespoon brewers yeast (optional)
3 tablespoon ground flaxseed (optional)
1 ½ teaspoon vanilla extract
1 egg + 1 egg yolk
11 oz butterscotch chips

Preheat the oven to 350 degrees. Line two baking sheets with parchment paper.

In a medium bowl, whisk oats, flour, salt, baking powder, baking soda, brewers yeast and flaxseed together, set aside. In a standing mixer, cream together butter and brown sugar until fluffy. Add vanilla, egg and egg yolk in and mix well. Add flour mixture and mix until batter is just combined. Gently fold in the butterscotch chips until the butterscotch is just incorporated. Use a small spoon to form 1” balls.

Bake in the preheated oven for 12-15 minutes until golden brown, taking care to not overbake. Remove baking pans from oven and let cookies cool on a wire rack until cool.

Note – to make ahead combine and store in freezer for up to 3 months in a airtight bag. Bake when ready to enjoy!

Mom’s Classic Chocolate Birthday Cake

Growing up, April was commonly referred to as “birthday month” in my household. From April 1st to the 15th, it was a nonstop celebration with my dad, Mom and my own birthday all occurring; even my parents’ anniversary is in the middle! When I found out I was pregnant with my son, I was quickly counting the months to see if we just added to the April count; thankfully, we just missed, and his birthday is in March! Despite the back-to-back celebrations we all have the same birthday cake, a classic white cake with chocolate frosting. Somehow even by the third celebration of the month, we all still enjoyed this cake!

I recently made this cake for my son’s 2nd birthday party, deciding it was time for him to have taste of our family classic. For someone who has limited access to sweets, as soon as he saw his cake, he immediately asked for a bite. Granted, I decorated his cake with a truck, which may have led him to beg for a taste, simply so he could play with the toy…

Eventually, he came back for bite, but opted for a cupcake instead because what two-year-old could bothered with a fork and plate? I’m sure this will become a staple in your household, but feel free to mix and match with your favorite flavor!

CAKE

½ lb [1 stick] unsalted butter, softened
1 ½ cups sugar
2 cups all-purpose flour
1 tablespoon baking powder
½ teaspoon salt
1 cup milk
2 teaspoons vanilla extract
4 large egg whites

FROSTING

½ lb [1 stick] unsalted butter, softened
1 lb [3 ¾ cups] powdered sugar
1 pinch [1/8 teaspoon] salt
3-4 oz unsweetened chocolate squares
2 tablespoons milk

Preheat oven to 350 degrees. Grease and lightly flour two 9 x 2 inch round cake pans, then line the bottoms with waxed paper.

To make the cake – In a medium bowl, whisk flour, baking powder and salt together, set aside. In a large bowl, cream the butter with a electric mixer until smooth. Add the sugar in gradually and beat until fluffy, about 2 minutes. Add the flour mixture in three parts, alternating with the milk and vanilla extract, beat well after each addition. In a separate bowl, beat the egg whites on high speed with a electric mixer until soft peaks form. Gently fold into the batter, making sure egg whites are combined. Divide the batter evenly amongst the cake pans. Bake for 22-25 minutes, until a toothpick inserted into the center of the cake comes out clean. Let the cakes cool in the pans for 15 minutes. Remove from pans and let cool completely on wire rack before frosting.

To make the frosting – In a medium saucepan over low heat, melt the chocolate stirring constantly until completely melted. Remove from the heat and set aside to cool. In a large bowl, beat the butter on medium speed until creamy, about 2 minutes. Lower the mixed to low and slowly add the milk and beat until smooth. Add the melted chocolate and beat well, about 2 minutes. Gradually add the sugar and salt and beat on low speed until creamy, about 3-5 minutes. Spread immediately onto the cooled cake and decorate as you wish!

Note – to make as cupcakes this recipe will yield 2 dozen cupcakes. To bake, line two 12-cup muffin tins with cupcake papers and fill three-quarters full. Bake for 20-25 minutes, until cake tested inserted in the center of the cupcake comes out clean.

Bunny’s Sticky Buns

A visit with my Grandma Bunny was synonymous with baked treats. I don’t ever remember a visit where she didn’t have something either in the oven or fresh from the oven when we arrived. Even if she wasn’t hosting and she was the visitor, you could always count on her to bring something or she would bake something close after her arrival. Her sticky buns were one of my favorites, the maple goodness coupled with the fluffy bun were devoured so quickly that I forgot I didn’t care for nuts, which they have!

This baked good is one that everyone in my family seems to remember and yet no one knew exactly how to make after she passed. Developing this recipe was like piecing together a puzzle, our memory of my grandmother lives on in baked items like this. The dough recipe is from one of my favorite cinnamon bun recipes by Abby Dodge from The Weekend Baker. The filling and sticky bun portion was developed through various trials to recreate a favorite. Through Abby Dodge’s cinnamon bun recipe, I discovered the ease of making cinnamon buns the night before and can easily be baked the next morning! If you aren’t sure you can commit to having a pan of these sitting around in your kitchen, they can easily be frozen and enjoyed at a later date just like my Grandma Bunny would always do. 

DOUGH
1 cup whole milk
8 tablespoons unsalted butter, cut into 6 pieces
3½ cups all-purpose flour
2¼ teaspoons (1 packet) instant yeast
1/3 cup granulated sugar
1 teaspoon table salt
1 large egg

FILLING
8 tablespoons unsalted butter
½
 cup packed dark brown sugar

TOPPING
2 cups chopped pecans (whole pecan also work is preferred)
½ cup unsalted butter
½ cup packed dark brown sugar
½
 cup pure maple syrup
2/3 cup whole milk
¼ teaspoon salt

  1. In a small saucepan over medium heat, combine the milk and the 8 tablespoons butter. Keep stirring constantly, until the butter melts and the liquid registers about 125 degrees on an instant-read thermometer; remove from the heat and set aside.
  2. In a large bowl of a stand mixer, combine the flour, yeast, sugar, and salt and mix until blended.
  3. Check the temperature of the milk mixture, it should now register about 120 degrees on an instant-read thermometer (make sure it’s no lower then 115 degrees for the yeast to grow). 
  4. Fit the mixer with the dough hook and with the mixer on medium-low speed, slowly pour the warm milk mixture into the flour mixture. With the mixer still running, add the egg and mix until the flour and egg are completely incorporated. Increase the speed to medium-high and beat until the dough is smooth and begins to pulls away from the bottom of the bowl, about 5 minutes. If the dough begins to climb the hook, stop the mixer and scrape the dough back into the bowl.
  5. Scoop up the dough and shape it into a ball. Lightly grease the bowl and put the dough back into it. Cover the top securely with plastic wrap (press and seal is very handy at a time like this!). Let the covered dough rise in a warm spot until nearly doubled in size, 45 to 55 minutes.
  6. While the dough is rising, make the topping. Lightly grease a 9-by-13-inch baking dish. Spread the pecans in an even layer in the pan and set aside. In a small saucepan over low heat, combine the balance of the topping ingredients (butter, dark brown sugar, maple syrup, milk and salt) and stir until the butter is melted. Bring to a boil and allow the mixture to boil for 3 minutes. Remove from the heat and pour on top of the pecans. Set aside and return to the dough once it is risen.
  7. Turn the dough out onto a clean surface and roll out the dough into a 12-by-17-inch rectangle; stretching the dough as necessary to get it into a rectangle. Melt the 8 tablespoons of butter and pour the melted butter into the center of the rectangle and spread evenly over the dough with a spatula. Sprinkle the 1/2 cup brown sugar evenly over the butter.
  8. Starting on a short side, roll up like a jelly roll. If necessary, pinch the long seam of the dough to the roll to seal. Position the roll, seam side down, on the work surface and cut into 12 slices (1 inch wide). Arrange the slices, cut side up, in the prepared pan on top of the pecan and syrup, forming 4 rows of 3 slices each.
  9. Preheat the oven to 350°. Bake rolls for 35-40 minutes until they are golden brown. Remove pan from the oven and allow to cool for 5 minutes.
  10. Using oven mitts, carefully invert the pan onto a large platter (expect the topping to melt down the sides once inverted). Serve warm or freeze portions for later use.

Note – to make overnight, prepare through step 8. Cover the rolls tightly and refrigerate for 8-12 hours. The next morning, remove from the refrigerator and allow to rise on the counter for 1-2 hours before continuing to step 9.

Freezing instructions – Baked rolls can be frozen for up to 3 months. Thaw overnight in the refrigerator and then reheat in the oven.

Fresh from the oven before you flip!

The “sticky” on the other side